Free Shipping Over $89
Your Burning Questions Answered
11/01/2025
Can I Use Duct Pipe for Wood Stoves?
 Author: Sean Summers, NFI Master Hearth Certified Technician – WoodstovePro.com
At WoodstovePro.com, we receive tons of customer questions every year about safe wood stove installation and venting. In this article, we will be answering these questions. Let’s start with a common - and dangerous - question:
Can I Use Duct Pipe for Wood Stoves?
The short answer is no. You should never use duct pipe for a wood stove. Duct pipe is designed for low-temperature air movement (like HVAC systems), not for the extreme heat that wood stoves produce.
Wood stoves can reach temperatures of 400°F to 900°F or higher. Duct pipe, which is often galvanized steel, begins to break down under those conditions. When heated, galvanized coatings can release toxic fumes, and the thin metal can warp or fail, leading to smoke leaks or even fire hazards.
Instead, always use stove pipe or Class A chimney pipe - aka, materials specifically engineered to handle high temperatures safely and maintain proper clearances from combustibles.
What’s the Difference Between Duct Pipe and Stove Pipe?
It’s easy to confuse the two because they look similar at a glance.
- Duct pipe: Made for ventilation, typically thin, single-wall galvanized metal. It is not heat-rated for solid fuel use.
- Stove pipe (connector pipe): Made of heavy-gauge black steel or double-wall construction, designed for connecting your stove to a chimney system.
- Class A chimney pipe: Double- or triple-wall insulated pipe for venting smoke outside your home. It’s the only kind approved to pass through walls, ceilings, or roofs.
How Do I Know What Pipe My Stove Needs?
Each wood stove has specific venting requirements listed in the owner’s manual. If you’re unsure, check the model number and contact an NFI Certified Hearth Professional for help selecting compatible pipe. At WoodstovePro.com, we carry top-rated brands like DuraVent, Selkirk, Metal-Fab, and Security Chimneys—each offering pipe tested to UL103HT standards.
Do I need a chimney liner for my existing fireplace?
Yes, inserts require properly sized liners for safe draft and performance.
How far should my stove pipe be from the wall?
Typically, 18 inches for single-wall pipe, or as close as 6 inches for double-wall pipe (check your manufacturer’s manual).
Can I install my own stove?
Some people do, but hiring a certified installer ensures compliance with local codes and maintains your warranty.
The Takeaway
I hope this has cleared up some of your questions about stoves and pipes! Use the right pipe for the job to protect your home, your investment, and your family.
For expert advice on choosing the correct venting components or stove, contact WoodstovePro.com at 888-418-0005 or info@woodstovepro.com. Our certified professionals are always happy to help.
Tax Credit Up to $2000!
09/04/2025
Tax Credit Deadline is Dec. 31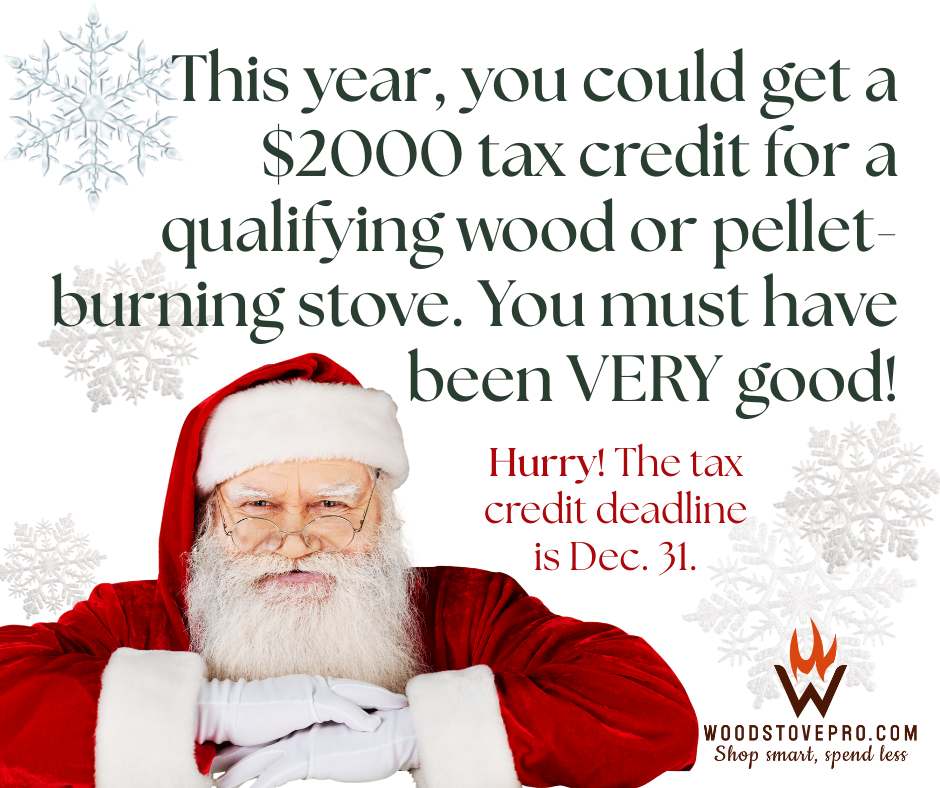
Author: Sean Summers, NFI Master Hearth Certified Technician – WoodstovePro.com
Good news for homeowners planning energy-saving home improvements! You could get a federal tax credit (Energy Efficient Home Improvement Tax Credit).
A tax credit is a reduction of your federal income tax. If you had taxes withheld, you may get a refund. If you owe taxes, it may reduce your tax liability.
The best news? A wood or pellet stove from WoodstovePro qualifies as an energy-saving improvement.
How Much is the Tax Credit Worth?
You can claim 30% of your cost, up to $2,000, if you buy an eligible wood-burning stove or pellet stove. The 30% includes the price of the stove and the cost to install it. You must have the unit installed by the Dec. 31st deadline to receive the credit.
To claim the tax credit, be sure the stove you are buying has the EPA certification. It must also have an HHV (Higher Heating Value) efficiency rating of 75% or more. This is important because a stove can have EPA Certification, and be very efficient, but not be at this 75% level.
What is EPA Certification?
The goal of EPA certification is to limit the amount of particulate matter (PM) a wood stove releases. The 2020 standards say a new wood burning unit should not release more than 2.5 grams per hour of particles. Learn more about wood stove efficiency at the EPA website.
An independent, accredited laboratory tests the stoves to be sure a wood or pellet stove is following the guidelines. You can verify a stove's certification status by checking its permanent EPA label or searching the EPA's database.
EPA-certified stoves produce less pollution, are more efficient, and are safer to use.
Keep Good Records
Be sure to have these records ready when tax time comes around. You will need these whether you do your own taxes or have a professional tax preparer handle them.
- Your receipt. This should have the date of purchase, the stove name and cost, and how much you paid for installation (if you had someone else install it).
- A copy of the Certification Statement. It confirms that the stove qualifies for the credit and is at least 75% efficient (HHV). This statement comes from the manufacturer.
- Form 5695 to file with your tax return to claim the credit.
Wood Stoves
We have compiled a list of all the wood stoves on woodstovepro.com that qualify for the IRS tax credit. You can click directly from this document to the stove(s) you want to know more about.
Wood Stoves that qualify for the 30% (up to $2000) Tax Credit.
This list has been updated with 17 qualifying Drolet stoves as of Sept. 25.
Pellet Stoves
We have done the same thing for our pellet stoves as well.
Pellet Stoves that qualify for the 30% (up to $2000) Tax Credit
Just a Reminder
WoodstovePro, and its employees or contractors, are not tax professionals. This article is to let you know about a great opportunity. Do not consider it tax advice, which should come from a professional.
Questions?
If you don't see the stove you want, or a brand you're looking for (like Vermont Castings), contact us at info@woodstovepro.com or call 888-418-0005. We can help you learn more about the tax credit, wood stoves, fireplaces, or other hearth products.
Gas Fireplaces 101: Everything You Need to Know Before You Buy
07/10/2025
Author: Sean Summers, NFI Master Hearth Certified Technician – WoodstovePro.com
A gas fireplace is one of the most convenient and attractive ways to bring warmth and ambiance into your home. I have installed countless gas fireplaces and know firsthand how they can transform a space and a home. One push of a button, and boom - homeowners can enjoy clean, consistent flames without the work of burning wood.
But before you buy a gas fireplace, it’s important to understand your options, how they work, and the key safety considerations.
Below, we answer the most common questions homeowners ask when choosing the right unit. Let’s get into it:
What are the main types of gas fireplaces?
Most gas fireplaces fall into two categories: direct vent and vent-free.
Both have advantages, but choosing the right one depends on local code, home layout, and your heating goals.
Direct Vent Gas Fireplaces
- Draw combustion air from outside
- Safely vent exhaust outdoors
- Offer excellent efficiency and indoor air quality
- Allowed in most jurisdictions
Vent-Free Gas Fireplaces
- Have no chimney or venting system
- Return heat directly into the room
- Operate with extremely clean combustion
- Are restricted or prohibited in some states
Which should I choose?
If indoor air quality and installation flexibility matter, direct vent is usually best. If you want maximum heat and simple installation—and local codes allow it—vent-free may be an option.
How energy-efficient is a gas fireplace?
Gas fireplaces can be extremely efficient, especially direct vent units. Because they use outside air for combustion and capture most of their heat before exhausting, many achieve 70–85%+ efficiency.
Vent-free units are even higher on paper because they do not vent heat outdoors, but homeowners should follow all gas fireplace safety guidelines and code requirements when considering them.
How safe are gas fireplaces?
Today’s gas fireplaces are built with multiple safety features, including:
- Oxygen depletion sensors (for vent-free units)
- Flame failure systems
- Tempered or ceramic safety glass
- Sealed fireboxes (for direct vent models)
- Properly engineered gas valves and igniters
When professionally installed and maintained, gas fireplaces are very safe. The biggest safety risks come from improper installation or user neglect, such as failing to have the unit inspected or misusing the appliance.
Do I need a chimney to install a gas fireplace?
Not necessarily. Direct vent fireplaces use a dual-wall pipe system that can run horizontally through a wall or vertically through a roof. Vent-free fireplaces require no venting at all.
This flexibility makes gas fireplaces ideal for homes without chimneys or for new constructions where adding a flue would be difficult.
Can a gas fireplace heat my whole home?
It depends on the model and layout of your home. Many fireplaces provide 20,000–40,000 BTUs, which is enough to heat large living areas. Some high-output models can act as a supplemental heat source for an entire floor.
If whole-home heating is your goal, choose a unit with:
- High BTU output
- A blower or fan kit
- Thermostat or remote control
- High-efficiency direct vent design
What maintenance does a gas fireplace require?
Even though gas burns cleanly, you should:
- Have the unit inspected annually
- Clean or replace glass and logs as recommended
- Ensure the venting system is clear
- Check the pilot assembly for dust accumulation
- Verify proper ignition
Routine maintenance improves efficiency and ensures gas fireplace safety throughout the heating season.
What should I consider before I buy a gas fireplace?
Before purchasing, think about:
- Your preferred type: direct vent vs vent-free
- Heat output (BTUs)
- Viewing style and flame appearance
- Room size and layout
- Installation costs
- Safety code requirements in your state
- Whether you want manual, remote, or thermostat controls
A hearth professional can help match your home’s needs to the right unit.
Final Thoughts
A gas fireplace offers the perfect combination of convenience, efficiency, and year-round comfort. Whether you're deciding between direct vent vs vent-free or exploring heating capabilities and safety features, understanding these basics will help you choose the right system for your home.
If you need help selecting or sizing a model, our certified team is here to assist. Contact us at 888-418-0005 or info@woodstovepro.com.
How to Store and Season Firewood the Right Way
06/24/2025
Author: Sean Summers, NFI Master Hearth Certified Technician – WoodstovePro.com
Burning quality firewood makes a huge difference in how your fireplace or wood stove performs. Well-seasoned wood burns hotter, cleaner, and more efficiently—while wet or “green” wood produces excess smoke, low heat output, and dangerous creosote buildup inside your chimney. If you want the best results from your stove or fireplace, knowing how to properly store and season firewood is essential.
Here’s a simple guide to help you prepare the wood for your fireplace the right way, with tips on moisture content, stacking, cover placement, airflow, and drying time.
Why Seasoned Wood Matters
Seasoning is the process of drying freshly cut firewood until it reaches the right moisture content for burning.
- Seasoned wood has a moisture content of 20% or less
- Green wood often exceeds 40–60% moisture
Wood with high moisture takes more energy to burn off the water inside the log, reducing heat output and creating more smoke. Quality seasoned wood burns hotter, ignites easier, and helps your fireplace run at peak efficiency.
How Long Does Firewood Take to Season?
Most hardwoods need 6–12 months to season properly, depending on the species, climate, and how well they’re stacked.
Fastest-drying woods include:
- Ash
- Maple
- Birch
Denser hardwoods like oak and hickory may take a full year or more to reach ideal moisture content.
Tip #1: Split Your Wood Early
Whole rounds take much longer to dry. Splitting your firewood into various sizes (typically 3–6 inches in diameter) dramatically increases airflow and speeds drying. Smaller pieces ignite faster, while larger logs provide sustained heat.
Tip #2: Stack for Maximum Airflow
Airflow is critical. When stacking wood for fireplace use, try:
- Elevating the wood off the ground (pallets work great)
- Leaving space between rows
- Facing cut ends toward the wind
- Using a crisscross pattern on the ends to improve stability and airflow
Avoid sealing the wood in tight piles—air needs to circulate.
Tip #3: Cover Only the Top, Not the Sides
The biggest mistake many homeowners make is fully wrapping their wood piles.
Correct method:
- Cover only the top to protect against rain
- Leave the sides exposed for airflow
A simple tarp, metal sheet, or wood cover works perfectly to prevent excess moisture without trapping humidity.
Tip #4: Keep Firewood Off the Ground
Ground moisture is one of the fastest ways to ruin a good stack. Elevate your pile on:
- Pallets
- Concrete blocks
- Pressure-treated runners
- A wood rack
This prevents rot, improves airflow, and helps reduce insect activity.
Tip #5: Use a Moisture Meter
The best way to confirm your firewood moisture content is with a simple moisture meter.
- Aim for 20% or less
- Test from the inside of a fresh split (not the outside surface)
This ensures you’re burning true seasoned wood and not just logs dried on the outside.
Tip #6: Store Close to the House, but Not Against It
It’s tempting to stack wood right against your exterior wall, but that can attract insects and trap moisture. Keep stacks at least a foot away from your siding and use a smaller indoor rack to store just a day or two of wood at a time.
Final Thoughts
Properly storing and seasoning firewood is one of the simplest ways to improve your fireplace experience. Dry, well-seasoned wood offers hotter burns, cleaner flames, and less creosote—keeping your home warmer and your chimney safer.
If you have questions about choosing the right wood for fireplace use or want advice on stove performance, our certified hearth experts are here to help. Contact us at 888-418-0005 or info@woodstovepro.com.
Electric Fireplaces: Frequently Asked Questions Answered
06/12/2025
Why choose an electric fireplace?
An electric fireplace provides the warmth and cozy ambiance of a fire without using wood or gas. It can be the perfect solution for someone when a wood or gas fireplace is not practical.
- Electric fireplaces are easy to install and don't need a chimney, venting, or gas lines. You can use one in almost any room in your house.
- With no real flames or emissions, electric fireplaces are safe for homes with children and pets. They often come with safety features like cool-touch exteriors and automatic shut-off.
- Electric fireplaces convert nearly all the electricity they use into heat. This heat conversion makes them an efficient way to warm a room.
- Since they are generally less expensive than wood-burning or gas fireplaces, electric fireplaces are cost-effective. You don't need to buy wood or pay for gas, and maintenance costs are minimal.
- Electric fireplaces can often be used all year. They have a “no heat” setting so you can have the flame effect without heat, providing ambiance even in warmer months.
- Unlike traditional fireplaces, electric models don't require cleaning of ashes or soot, making them a low-maintenance option.
- Since they don't burn fuel, electric fireplaces don't produce emissions, making them a more environmentally friendly choice.
Do electric fireplaces give off heat?
Electric fireplaces use a heating element, often combined with a fan, to distribute warmth into a room. This is similar to how a space heater operates.
Many electric fireplaces come with adjustable heat settings. You control the amount of heat based on room size and personal comfort.
Do electric fireplaces use a lot of electricity?
Electric fireplaces are generally considered energy-efficient. The amount of electricity they use can vary based on several factors. The size of your fireplace, local electricity rates, and how many hours you run the fireplace will all affect your electric costs.
On average, using your fireplace for heating can be around 12-15 cents per hour. If you use the fireplace for ambiance without heat, the cost is significantly lower.
Are electric fireplaces safe?
You should buy your electric fireplace from a reputable source (like woodstovepro.com) that has certified hearth professionals to help you select the best and safest option for your situation. Here are some safety facts for you to consider.
- Electric fireplaces simulate the appearance of flames using LED lights, so there's no risk of fire from open flames.
- They don't produce smoke, fumes, or carbon monoxide, making them a clean and safe option for indoor use.
- The exterior typically remains cool, reducing the risk of burns, which is especially important in homes with children or pets.
- Many models come with built-in overheat protection, which automatically shuts off the unit if it gets too hot.
- Electric fireplaces don't produce combustion gases. You will not need a chimney or vent, which removes the risk of chimney fires or gas leaks.
Can you put an electric fireplace in a TV stand?
Yes, many TV stands are specifically designed to hold fireplaces. Be sure to use a TV stand made for a fireplace for the safest possible setup.
Are electric fireplaces difficult to operate?
No, most people consider them easy to use. You usually only need to push a button to turn it on or to adjust the heat and flame. Many also come with a remote control.
How do you install an electric fireplace?
You can often install one by simply plugging it in. Electric fireplaces do not need venting, so they can be used in almost any room in the house.
Some models, like built-ins or those with higher wattage, may require special wiring. You should hire a professional electrician in those cases.
Who can tell you more?
Woodstovepro.com's experts are happy to help. Contact them at info@woodstovepro.com or 888-418-0005.
Chimney Pipe 101: Frequently Asked Questions Answered
03/01/2025
What is stove or connector pipe?
Stove pipe, technically called connector pipe, connects your stove to a chimney or vent system to send exhaust gases out of your house. It's typically made of a single layer of heavy-gauge, cold-rolled steel, and it is often known as black pipe. It is a crucial component of a wood stove—meaning you have to have it. Sometimes double-walled black pipe is used in place of single-wall black pipe to enable closer clearances to combustibles, and although it is a double-walled pipe, it is still considered stove pipe or connector pipe.
Stove pipes are not the same thing as chimney pipes although you frequently hear them discussed together. Stove pipes are for interior use only and are smaller in outside diameter than chimney pipes, which are typically installed outdoors. Chimney pipes are made of a double- or triple-layer metal and provide insulation to keep heat from escaping.
Is stove pipe necessary to run my fireplace?
It depends. All solid fuel fireplaces (wood, pellet, coal) must be vented to the outside, which requires pipe. Direct-vent gas fireplaces or gas log sets also need piping to vent the carbon monoxide.
Electric fireplaces and vent-free gas fireplaces or gas log sets do not need piping.
How hot do wood stoves get?
Temperatures for wood stoves have many variables such as the type of wood you're burning, solid fuel moisture content, and the amount of airflow to your fire. For peak efficiency and to keep creosote from building up in your chimney, the ideal temperature range is between 400°F and 600°F.
Burning too hot can damage your stove, and burning too cool can cause creosote to build up in your chimney. Don't guess on your temperature; use a stovepipe thermometer to be sure you're in range.
What chimney brands are compatible with my wood stove?
This is not a simple answer. There are many variables involved in the chimney you need for your wood-burning stoves and fireplaces, and it's best to talk it over with an expert before buying your chimney material. We are happy to help you find what you need, call us at 888-418-0005.
What is all-fuel chimney pipe and do I have to get a certain kind?
All-fuel chimney pipe is (as the name implies) designed to be used with all fire fuel types: wood, gas, pellets, or biofuels. Many companies manufacture all-fuel chimney pipe, which is also known as Class A chimney pipe. Class A is an insulated chimney pipe that comes in a variety of diameters to match the specific heating source or appliance. Some all-fuel chimneys are made of stainless steel and feature twist-lock couplings for quick installation.
Often the term Class A is used in reference to insulated double walled chimney systems such as Metal Fab Temp Guard, DuraVent DuraTech, Duravent DuraPlus, Selkirk Ultra Temp, and Selkirk SuperPro pipe.
Can I use a duct pipe for my wood stove?
No, duct pipe is not built to handle the intense heat produced by a wood stove, which can lead to damage and potential fire hazards. Duct pipe is often galvanized steel which will create dangerous off gases when under intense heat. Chimney and some connector pipes are made with multiple wall layers for better insulation, while duct pipes are typically single-wall. Plus, using the wrong pipe for your wood stove may violate local building codes. Learn more here.
What is the difference between double-wall and single-wall stove pipe?
If you have only 6 to 18 inches of clearance between your wall and your stove, you need to use a double-wall pipe because it is air insulated. The outside of double-wall pipe does not radiate heat like single-wall pipe and is always recommended for use in a mobile home.
Double-wall pipe typically
- Lasts longer and improves the performance of your fireplace because the flue will have a higher and more consistent temperature
- Costs more than single-wall pipe
- Produces less creosote
- Offers fewer size options
If you have a clearance of 18" or more, you can choose either single-wall or double-wall. Single-wall pipe typically
- Is less costly than double-wall pipe
- Radiates heat back into your room
- Comes in a variety of sizes
What kind of stove pipe do you use outside?
A wood stove needs a stovepipe, also called a chimney connector or black pipe, to connect the stove to the outside of the building:
A stovepipe is used to connect the stove to a masonry chimney or prefabricated metal chimney. Insulated chimney is the only pipe that can pass through combustibles and can be used outside. The stovepipe is sometimes referred to as a connector. Single-wall, 24-gauge or thicker, corrosion-resistant steel stovepipe is recommended. If the stovepipe diameter is over 10 inches, a heavier gauge metal must be used.
Most stoves do not include venting pipe. It will need to be purchased separately.
How high does a wood stove pipe need to be above the roof?
The chimney should extend at least 3 feet above the highest point where it passes through the roof surface. It should also be at least 2 feet higher than any part of the building within a horizontal distance of 10 feet.
To calculate your necessary chimney height, please read our article The 10-Foot, 2-Foot, 3-Foot Rule.
How do you clean chimney pipe?
A clean chimney is vital to the efficiency and safety of your wood-burning fireplace or stove. It's a big job that requires time, knowledge, and special equipment. We recommend hiring a professional chimney sweep in your area; however, there are products and tutorials available for doing the job yourself.
Questions?
Is there a question you have that you didn't see here? We're happy to help find the answer for you. Contact us at info@woodstovepro.com or 888-418-0005.
Call us at 888-418-0005 or email info@woodstovepro.com to discuss which option is best for your situation. You can also visit our YouTube channel to learn more.
Wood Burning Fireplace Safety Tips for the Holidays
11/16/2024

Author: Sean Summers, NFI Master Hearth Certified Technician – WoodstovePro.com
The holidays are the perfect time to gather around a warm, crackling fire. But before you light your wood-burning fireplace this season, take a few precautions to make sure your celebration stays merry, bright - and safe!
Here are my top fireplace safety tips to help you enjoy cozy fires all winter long without worry.
1. Schedule a Professional Chimney Inspection
Before the first log of the season, have your chimney inspected and cleaned by a certified professional. Over time, soot and creosote build up inside your flue, creating a serious fire hazard. A yearly inspection ensures your venting system is clear, sealed properly, and up to code.
2. Burn Only Dry, Seasoned Firewood
Wet or unseasoned wood produces excess smoke and sticky creosote that can clog your chimney. Choose seasoned hardwoods like oak, maple, or ash for a hotter, cleaner burn. Avoid burning pine, treated wood, or wrapping paper—they create sparks and toxic fumes.
3. Use a Fireplace Screen or Glass Doors
Flying sparks and embers are common causes of holiday house fires. Protect your home and family by using a spark screen or fireplace glass doors. They let you enjoy the fire’s glow while keeping stray embers where they belong—inside the firebox.
4. Keep Decorations and Stockings at a Safe Distance
It’s tempting to hang holiday stockings right over the fire, but fabric and greenery can ignite easily. Keep decorations, garlands, and wrapped gifts at least three feet away from the fireplace. Choose flame-retardant materials for anything that hangs nearby.
5. Never Leave a Fire Unattended
Whether you’re wrapping gifts or heading to bed, make sure every fire is completely out before leaving the room. Use fireplace tools to spread the ashes and douse remaining embers with water or sand. Always close your damper once the ashes are cool to prevent heat loss and drafts.
6. Check Your Smoke and Carbon Monoxide Detectors
Make sure both are working properly before lighting your first fire of the season. Fresh batteries and monthly tests can save lives.
Stay Cozy and Safe This Holiday Season
A wood-burning fireplace adds warmth and charm to holiday gatherings, but safety should always come first. Follow these simple steps to enjoy a beautiful fire without risk.
For fireplace accessories, replacement parts, and safety tools, visit WoodstovePro.com—or call 888-418-0005 for expert advice from our certified hearth professionals.
Is All Stainless Steel Chimney Pipe the Same? What to Know Before You Buy
06/29/2017
Author: Sean Summers, NFI Master Hearth Certified Technician – WoodstovePro.com
When shopping for stainless steel chimney pipe, many homeowners assume that “stainless is stainless.” In reality, not all stainless steel chimney pipe is the same—and choosing the wrong type can affect performance, lifespan, and long-term safety. Differences in steel composition, corrosion resistance, and intended use matter far more than most buyers realize.
If you’re comparing options or wondering about 304 vs 430 stainless steel, here’s what you need to know before you buy.
Why Stainless Steel Matters in Chimney Systems
Chimney pipe is exposed to extreme conditions:
- High temperatures
- Rapid heating and cooling cycles
- Moisture and condensation
- Acidic byproducts from wood, pellet, or oil combustion
The type of stainless steel used directly impacts chimney pipe corrosion resistance, durability, and overall safety. Lower-grade materials may look fine initially but can degrade quickly when exposed to flue gases and moisture.
Ferritic vs Austenitic Steel: What’s the Difference?
The biggest distinction in chimney pipe materials comes down to ferritic vs austenitic steel - two categories of stainless steel with very different properties.
Ferritic Stainless Steel (430 Stainless Steel)
430 stainless steel is a ferritic grade, meaning it contains iron and chromium but little to no nickel.
Key characteristics:
- Magnetic
- Lower cost
- Moderate corrosion resistance
- Good heat tolerance
Where it’s typically used:
430 stainless steel is commonly used for the outer wall of chimney pipe, where it is not directly exposed to flue gases. It performs well structurally but is less resistant to acidic corrosion.
Austenitic Stainless Steel (304 Stainless Steel)
304 stainless steel is an austenitic grade, containing higher chromium and nickel content.
Key characteristics:
- Non-magnetic
- Excellent corrosion resistance
- Handles acidic condensates well
- Superior durability in harsh environments
Where it’s typically used:
304 stainless steel is the industry standard for the inner liner of chimney pipe because it resists corrosion from creosote, moisture, and acidic byproducts.
304 vs 430 Stainless Steel: Why the Difference Matters
The debate over 304 vs 430 stainless steel isn’t about which is “better” overall—it’s about using the right material in the right place.
|
Feature |
304 Stainless Steel |
430 Stainless Steel |
|
Steel Type |
Austenitic |
Ferritic |
|
Corrosion Resistance |
Excellent |
Moderate |
|
Nickel Content |
High |
Minimal |
|
Typical Use |
Inner liner |
Outer wall |
|
Cost |
Higher |
Lower |
High-quality chimney systems often combine the two: 304 stainless steel inside for protection and longevity, 430 stainless steel outside for strength and cost efficiency.
Why Corrosion Resistance Is Critical
Poor chimney pipe corrosion resistance can lead to:
- Rusting and flaking metal
- Pinholes in the liner
- Reduced draft
- Leaking smoke or gases
- Shortened chimney lifespan
Wood-burning appliances produce creosote and acidic moisture that aggressively attack low-grade steel. Using 304 stainless steel in the liner dramatically reduces these risks and extends the life of your chimney system.
Climate and Fuel Type Also Matter
You may want higher-grade materials if you:
- Burn wood or pellets frequently
- Live in a coastal or high-humidity area
- Use your stove as a primary heat source
- Experience long burn cycles
In these cases, investing in better materials up front can save you from premature replacement and costly repairs later.
What to Look for When Buying Stainless Steel Chimney Pipe
Before purchasing, make sure to:
- Confirm which stainless steel grade is used for the inner liner
- Check manufacturer specifications
- Ensure compatibility with your appliance
- Verify UL listing and code compliance
- Consider your climate and fuel type
Not all “stainless steel chimney pipe” listings are created equal—details matter.
Final Thoughts
So the answer to the title question is, no, not all stainless steel chimney pipe is the same. Understanding the difference between ferritic vs austenitic steel, and especially 304 vs 430 stainless steel, helps you choose a chimney system built for safety, durability, and long-term performance.
If you have questions about chimney pipe materials or need help selecting the right system for your stove or fireplace, our certified hearth experts are here to help. Contact us at 888-418-0005 or info@woodstovepro.com.
Understanding and Calculating Roof Pitch
05/09/2017
Written by Sean Summers, National Fireplace Institute (NFI) Master Hearth Certified Technician - WoodStovePro.com
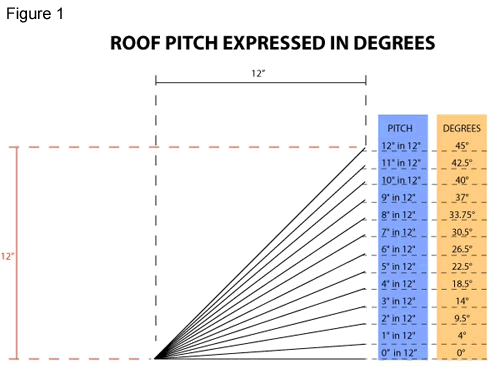
Roof pitch is simply a numerical expression of the steepness of a roof.  In the U.S., this is usually represented by a fraction in which the numerator signifies the rise and the denominator the run. For example, if we have a roof that rises 4 inches over 12 inches of run, then we would denote it as a 4/12 pitch. Pitch can also be expressed in degrees and discussed as an angle (see Figure 1).
 The calculation of pitch is fairly simple. If you have two tape measures, or rulers, you can find the pitch from the rooftop or inside your attic space. Refer to Figure 2 to see how to arrange your tools for measuring pitch.
Please remember to be cautious when working on your roof or unfinished attic space. If you still have questions, please leave a comment or send us an email. We are always happy to help.
The 10-Foot 2-Foot 3-Foot Rule
05/02/2017
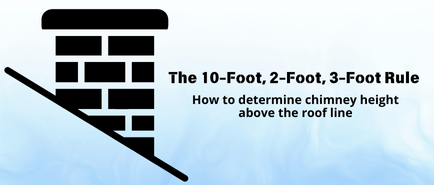
How to Determine the Chimney Height Above the Roofline
Questions about this rule come up a lot, and there seems to be a lot of confusion about it. Thankfully, this standard is actually quite simple. In most cases, with just two pieces of information, you can calculate the height of your chimney on paper without ever having to climb on the roof.
 First, you’ll need to know the pitch of your roof.
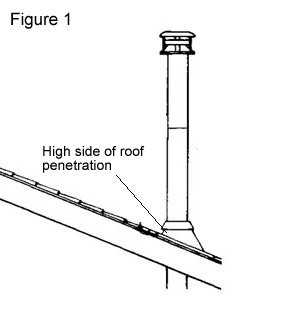
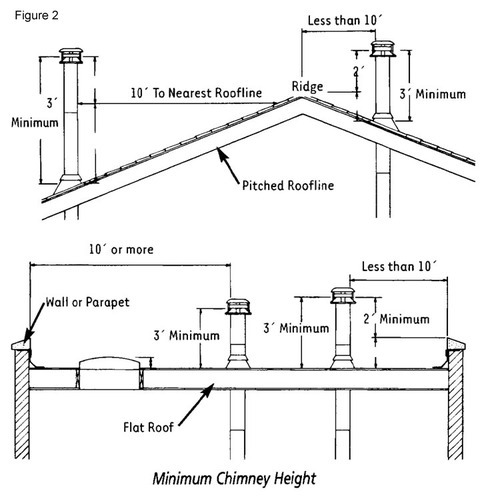
Roof pitch is easily calculated, and if you don’t know how, read my article Understanding and Calculating Roof Pitch. Also, you’ll need the horizontal distance between the peak and the edge of the high side of the pipe (see Figure 1) where you plan your roof penetration. We’ll go over the math a little further down; first let’s go over the 10 and 2 rule (see Figure 2).
Chimney height requirements
Most wood stove and factory-built fireplace manufacturers (and local building codes) will require that “the chimney must extend at least 2 feet above any portion of any structure within 10 feet (measured horizontally) and must extend at least 3 feet above the highest point of its roof penetration.”**
 Keep in mind there is generally a minimum chimney height requirement for the overall system (usually 15 feet, which sometimes includes connector pipe) that can affect the finished height of your chimney system. Other factors can influence the necessary height of the chimney such as “house stack effect” and high altitude. “Chimney height may need to be increased by 2-3% per 1000 feet of elevation.”** Although added height generally equates to stronger draft, there is a point where the system can become too long and over-drafting might occur, causing increased fuel consumption, hotter burn temperatures, and damage to your appliance.
 Now for the math lesson
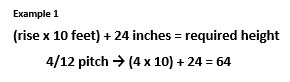
Roof pitch is expressed as a ratio of rise over run. Rise is the length, expressed in inches, that the roofline travels upward over a 12-inch horizontal distance, which is known as the run. For example, a common pitch like 4/12 would mean that for every 12 inches of run, the roof rises 4 inches. So, if the 10-foot, 2-foot rule requires us to measure 10 feet to the nearest roofline, or structure, then we can use the rise to calculate a height requirement. Back to our example, over a run of 10 feet, the roof would rise 40 inches. Additionally, per our rule, we need to add 2 feet, or 24 inches, giving us a total height of 64 inches. So, take the top number of your roof pitch and multiply it by 10 then add 24, note Example 1. If your calculated required height falls below 36 inches (3 feet), then, as per our rule, it must be a minimum of 3 feet on the high side of the pipe penetration.
 This calculation from Example 1 alone would give you a solid working height, but if you are close to your peak then you might have more pipe height than you actually need. If you can measure the horizontal distance between the peak and the edge of the high side of the pipe where you plan your roof penetration, you can use that to calculate your height in relation to your roof peak or ridgeline. Often you can measure this from inside the room where you are planning to install the stove or inside the attic space. Many people mistakenly think that the pipe always has to be 2 feet above the roof peak.
 Let’s look at a couple of examples.
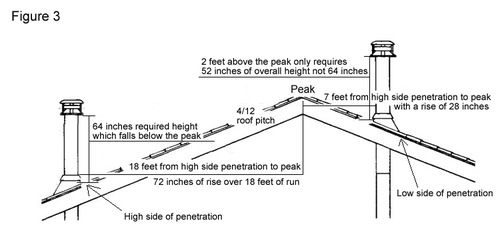
You are close to your eave and you find that your measurement is 18 feet from peak to penetration on a 4/12 pitch (see Figure 3). For 18 feet of run, you would have a rise of 72 inches. If the previous calculation results in the required height of 64 inches, we can see that the top of the pipe will not rise above the roof peak but would still meet the requirements of the rule. For the next example, you have a shorter chimney height. If your peak to penetration distance is 7 feet, you would have a rise of 28 inches. Per the 10 and 2 rule, once you are at the level of the peak, you only need to be 2 feet above it. So 28 inches plus 24 inches is a chimney height of only 52 inches. This reduces the actual required height by 12 inches from our previous calculation of 64 inches.
Please note that this rule doesn’t generally apply to pellet and gas vent systems. Hopefully this article helped you understand the 10 and 2 rule but if you still have questions, leave a comment or send us an email. We are always happy to help.
Written by Sean Summers, National Fireplace Institue (NFI) Master Hearth Technician - WoodstovePro.com
*This post is meant to be a guide so always consult your appliance owner’s manual and local code before planning your system.
**Woodburning Hearth System Reference Manual. Hearth Education Foundation. Dec. 2002 pg. 92
More Articles
- Chimney Liner Sizing Basics: Matching Liner Diameter to Your Appliance
- Chimney Pipe Brand Guide: DuraVent vs Selkirk vs Metal-Fab
- Spring Fireplace Maintenance: What to Do After Heating Season Ends
- Electric Logs vs Electric Fireplaces: Which Is Best for Your Space?
- Outdoor Gas Heating Options: Gas Space Heaters vs Gas Fire Pits
- How to Choose the Right Firewood Rack and Storage Setup
- Creosote 101: What It Is, Stages, and How to Reduce Buildup
- Replacing a Fireplace Blower Fan: Symptoms, Options, and Fit Tips
- Electric Fireplace Placement Guide: Wall-Mount, Built-In, or TV Stand?
- Pellet Insert Maintenance Tips: Cleaner Burns and Fewer Shutdowns
- How to Improve Wood Stove Efficiency: Burn Hotter, Cleaner, Longer
- Gas Logs: Vented vs Vent-Free Logs (Realism, Heat, and Safety)
- Class A Chimney System Components: Tees, Supports, and Why They Matter
- Best Fireplace Screens for Safety: Styles, Fit Tips, and Placement
- Gas Insert Buying Guide: Sizing, BTUs, and Choosing the Right Model
- Wood Stove Break-In Guide: First Fires, Curing Paint, and What to Expect
- Chimney Flashing and Roof Leaks: How to Spot Problems Early
- Electric Fireplace Operating Costs: Do Electric Fireplaces Use a Lot of Electricity?
- Pellet Quality Matters: How Pellets Affect Heat, Ash, and Maintenance
- Clearance to Combustibles Explained: The Safety Rule Homeowners Miss
- Chimney Caps 101: Which Type Do You Need and Why?
- Propane vs Natural Gas Fireplaces: What to Know Before You Choose
- Fireplace Glass Doors: Benefits, Fit Tips, and Safety Basics
- How to Heat Your Home Safely During Power Outages
- The Pros and Cons of Vent-Free Gas Fireplaces
- When to Replace Your Wood Stove Gaskets (and How to Do It Right)
- EPA Certified Wood Stoves Explained: What It Means and Why It Matters
- Top Fireplace Accessories That Make Heating Safer and Easier
- Winter Fireplace Checklist: Is Your Hearth Ready for Heating Season?
- Wood Stove Placement Tips for Maximum Heat Distribution
- Pellet Stove Maintenance 101: Common Questions Answered
- Choosing Between Gas Logs and Gas Inserts
- All About Chimney Liner Types and When to Replace Them
- 7 Signs It’s Time to Replace Your Fireplace or Stove
- Wood vs. Pellet Stoves: Which Fits Your Lifestyle?
- Understanding Double-Wall vs. Single-Wall Stove Pipe
- How to Keep Pets and Kids Safe Around Fireplaces
- Top 10 Fireplace Accessories Every Homeowner Needs This Season
- 5 Signs It’s Time to Replace Your Chimney Pipe
- How to Choose the Right Wood Stove for Your Home Size
- Your Burning Questions Answered
- Tax Credit Up to $2000!
- Gas Fireplaces 101: Everything You Need to Know Before You Buy
- How to Store and Season Firewood the Right Way
- Electric Fireplaces: Frequently Asked Questions Answered
- Chimney Pipe 101: Frequently Asked Questions Answered
- Wood Burning Fireplace Safety Tips for the Holidays
- Is All Stainless Steel Chimney Pipe the Same? What to Know Before You Buy
- Understanding and Calculating Roof Pitch
- The 10-Foot 2-Foot 3-Foot Rule
- How to Select the Perfect Wood Stove
© 2006-2026 E-Prosites ![]()
![]()
![]()
![]()
![]()