Stainless Steel As It Relates Woodstove and Fireplace Chimney Pipe: Class A Solid Fuel UL 127 and UL 103 HT Venting Systems
Written by: Sean Summers, National Fireplace Institute (NFI) Master Hearth Certified Technician - WoodStovePro.com
Stainless steel is a general term for a group of corrosion resistant steels containing a minimum of 10.5 percent of chromium. Varying additions of nickel, molybdenum, titanium, niobium and other elements may be present. The mechanical properties and behavior in service of the various types of steel depend upon their composition, and careful selection of the most appropriate steel grade is vital to success in any application.1
There are a few types of stainless steel, but for our purposes we’ll only focus on ferritic and austenitic (Figure 1). Ferritic stainless steels are plain chromium stainless steels, usually with low carbon content. They are magnetic and have good ductility and resistance to corrosion and oxidation. They are generally resistant to stress corrosion cracking.2 Ferritic stainless steel shares some traits with austenitic stainless steel but contains no nickel; therefore, they are less expensive to manufacture. 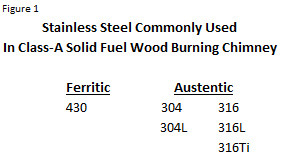 This allows for a lower price point chimney pipe.
Austenitic stainless steels are those containing chromium and nickel with very low carbon content. They are non-magnetic, but can become slightly magnetic when cold worked. Cold working also enhances their strength. Austenitic stainless steels have excellent corrosion resistance; good formability; good weldability, and excellent mechanical properties over a wide range of temperatures.2 The addition of nickel increases corrosion resistance but also adds to the cost of the material.
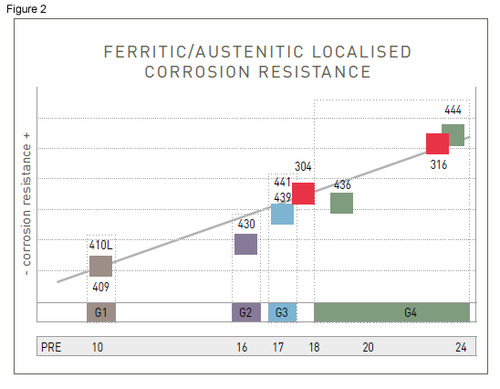 Figure 2 demonstrates how austenitic stainless steels, 304 and 316, match up against ferritic stainless steels.3We can see that 304 has better corrosion resistance than 430, but 316 is an even better choice for use with corrosive materials.
Stainless steel grades 304L, 316L and 316Ti have altered compositions that have been developed to achieve different attributes. In the case of 304L and 316L, the carbon has been reduced. Carbon strengthens austenite so it is a useful alloying element in stainless steels used in applications like boiler tubes that operate at high temperature. Carbon has no other useful function and can be detrimental to corrosion resistance under certain circumstances.4 316Ti is a titanium stabilized version of 316 used where good resistance to intergranular corrosion and high temperature strength is required.5 So 316Ti is sometimes used in components that require elevated temperature strength and corrosion resistance such as flexible chimney liners.
When deciding which chimney to purchase, it is important to consider what fuel you will be burning and your budget. In most applications, 430 will do an excellent job and is cost effective. In situations where coal is the fuel of choice, a higher grade stainless steel would be a better choice. Below is a chart of various manufacturers’ chimney compositions. Woodstovepro.com carries M&G Duravent DuraTech and DuraPlus, Metal Fab TempGuard, Security Chimney Secure Temp and Selkirk UltraTemp, GalvaTemp and SuperPro.

If you have any questions, please leave a comment or send us an email. We are always happy to help.
*E-prosites has made every effort to ensure the information presented is technically correct. However E-prosites does not represent or warrant the accuracy of the information contained in this blog. This blog is for information purposes only. E-prosites, its officers and employees, disclaim any and all liability or responsibility of any kind for loss, damage or injury resulting from the use of the information contained in this publication. Please consult with pipe manufacturer for all technical specifications and advice.
1 British Stainless Steel Association - SSAS Information Sheet No.1.1 – March 2001
2 The Southern Africa Stainless Steel Development Association (SASSDA) website
3 International Stainless Steel Forum (ISSF) – The Ferritic Solution: Properties, Advantages, Applications – 2007
4 International Molybdenum Association (IMOA) – Practical Guidelines for the Fabrication of High Performance Austenitic Stainless Steels - 2010
5 Australian Stainless Steel Development Association (ASSDA) website
Understanding and Calculating Roof Pitch
Written by: Sean Summers, National Fireplace Institute (NFI) Master Hearth Certified Technician - WoodStovePro.com
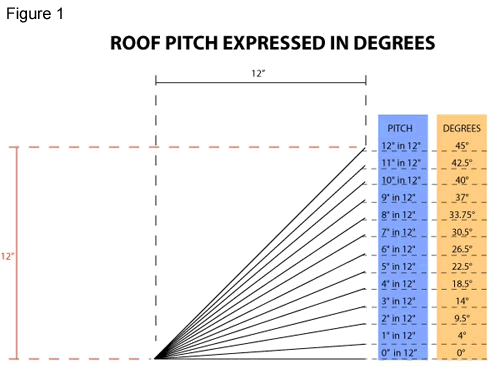
Roof pitch is simply a numerical expression of the steepness of a roof.  In the U.S., this is usually represented by a fraction in which the numerator signifies the rise and the denominator the run. For example, if we have a roof that rises 4 inches over 12 inches of run, then we would denote it as a 4/12 pitch. Pitch can also be expressed in degrees and discussed as an angle (see Figure 1).
 The calculation of pitch is fairly simple. If you have two tape measures, or rulers, you can find the pitch from the rooftop or inside your attic space. Refer to Figure 2 to see how to arrange your tools for measuring pitch.
Please remember to be cautious when working on your roof or unfinished attic space. If you still have questions, please leave a comment or send us an email. We are always happy to help.
Understanding the 10-Foot 2-Foot 3-Foot Rule: How to Determine the Chimney Height of Class A Solid Fuel Pipe Above the Roofline
Written by: Sean Summers, National Fireplace Institute (NFI) Master Hearth Certified Technician - WoodStovePro.com
Questions about this rule come up a lot, and there seems to be a lot of confusion about it. Thankfully, this standard is actually quite simple. In most cases, with just two pieces of information, you can calculate the height of your chimney on paper without ever having to climb on the roof.
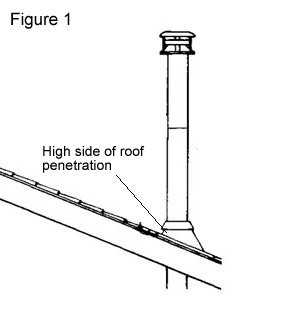 First, you’ll need to know the pitch of your roof. Roof pitch is easily calculated, and if you don’t know how, read my article Understanding and Calculating Roof Pitch. Also, you’ll need the horizontal distance between the peak and the edge of the high side of the pipe (see Figure 1) where you plan your roof penetration. We’ll go over the math a little further down; first let’s go over the 10 and 2 rule (see Figure 2).
Most wood stove and factory-built fireplace manufacturers (and local building codes) will require that “the chimney must extend at least 2 feet above any portion of any structure within 10 feet (measured horizontally) and must extend at least 3 feet above the highest point of its roof penetration.”**
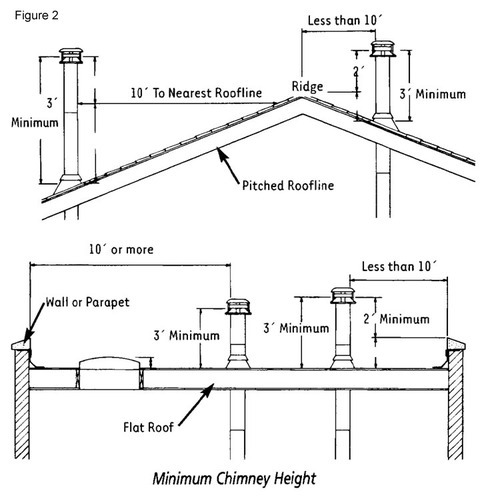 Keep in mind that there is generally a minimum chimney height requirement for the overall system (usually 15 feet, which sometimes includes connector pipe) that can affect the finished height of your chimney system. Other factors can influence the necessary height of the chimney such as “house stack effect” and high altitude. “Chimney height may need to be increased by 2-3% per 1000 feet of elevation.”** Although added height generally equates to stronger draft, there is a point where the system can become too long and over-drafting might occur, causing increased fuel consumption, hotter burn temperatures, and damage to your appliance.
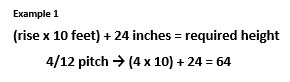
Now for the math lesson. Roof pitch is expressed as a ratio of rise over run. Rise is the length, expressed in inches, that the roofline travels upward over a 12-inch horizontal distance, which is known as the run. For example, a common pitch like 4/12 would mean that for every 12 inches of run, the roof rises 4 inches. So, if the 10-foot, 2-foot rule requires us to measure 10 feet to the nearest roofline, or structure, then we can use the rise to calculate a height requirement. Back to our example, over a run of 10 feet, the roof would rise 40 inches. Additionally, per our rule, we need to add 2 feet, or 24 inches, giving us a total height of 64 inches. So, take the top number of your roof pitch and multiply it by 10 then add 24, note Example 1. If your calculated required height falls below 36 inches (3 feet), then, as per our rule, it must be a minimum of 3 feet on the high side of the pipe penetration.
 This calculation from Example 1 alone would give you a solid working height, but if you are close to your peak then you might have more pipe height than you actually need. If you can measure the horizontal distance between the peak and the edge of the high side of the pipe where you plan your roof penetration, you can use that to calculate your height in relation to your roof peak or ridgeline. Often you can measure this from inside the room where you are planning to install the stove or inside the attic space. Many people mistakenly think that the pipe always has to be 2 feet above the roof peak.
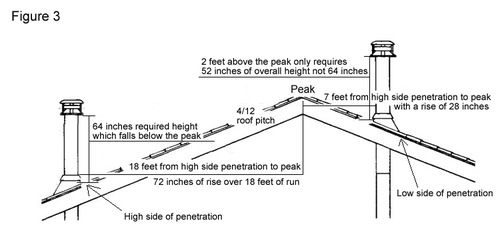 Let’s look at a couple of examples. You are close to your eave and you find that your measurement is 18 feet from peak to penetration on a 4/12 pitch (see Figure 3). For 18 feet of run, you would have a rise of 72 inches. If the previous calculation results in the required height of 64 inches, we can see that the top of the pipe will not rise above the roof peak but would still meet the requirements of the rule. For the next example, you have a shorter chimney height. If your peak to penetration distance is 7 feet, you would have a rise of 28 inches. Per the 10 and 2 rule, once you are at the level of the peak, you only need to be 2 feet above it. So 28 inches plus 24 inches is a chimney height of only 52 inches. This reduces the actual required height by 12 inches from our previous calculation of 64 inches.
Please note that this rule doesn’t generally apply to pellet and gas vent systems. Hopefully this article helped you understand the 10 and 2 rule but if you still have questions, please leave a comment or send us an email. We are always happy to help.
*This post is meant to be a guide so always consult with your appliance owner’s manual and local code before planning your system.
**Woodburning Hearth System Reference Manual. Hearth Education Foundation. Dec. 2002 pg. 92
Tips and Buyer’s Guide for Selecting the Perfect Wood Stove
Written by: Sean Summers, National Fireplace Institute (NFI) Master Hearth Certified Technician - WoodStovePro.com
There are many reasons people decide to purchase a wood stove. Everything from saving money to the nostalgia of growing up with a stove can play a role in the decision-making process. More often than not, many consumers are under informed when they begin their search for a wood stove. I hope this article will serve as a guide to help you plan and select the perfect wood stove.
Wood Stove Construction
There are two basic types of wood stoves on the market today: a steel wood stove and a cast iron wood stove. A steel wood stove is built from different gauges of steel that are welded together to create a wood stove. This type of construction is very durable provided that the firebox is designed to withstand many long hours of heat and the steel used in construction is heavy and of good quality. A cast iron wood stove is made by individually casting parts and then assembling them with gaskets to create a wood stove. A cast iron wood stove will eventually need rebuilt when the gaskets finally wear out, but they often make up for this failing by being more attractive than the average steel wood stove. One exception is the Napoleon cast iron wood stoves (1100C, 1400C), which are really steel wood stoves with cast iron parts bolted to the outside making them appear to be cast iron wood stoves. It has the beauty of cast iron without the drawback of being sealed with gaskets.
EPA Certification
During the 1980s the EPA began regulating wood stoves in an effort to reduce pollution and improve air quality. These regulations forced many manufacturers to invent ways to burn wood fuel much more efficiently. The first wood stoves after the regulations went into effect were built with catalytic combustors that allowed the unburned smoke to combust at lower temperatures inside the wood stove. Catalytic combustors are problematic because efficiency steadily drops over the not-so-long life span and need to be replaced. Wood stoves are still being built today with this technology. The next generation of wood stoves was built to inject super heated air into the unburned smoke and allow it to combust at higher temperatures. This is accomplished in various ways by each manufacturer, but the technology allows wood stoves to maintain efficiency over their lifetime without regular part replacement. Some manufacturers have chosen to keep their wood stoves rated under different categories such as coal which allows them to avoid EPA certification. An educated consumer should be careful to choose EPA-rated wood stoves because the long term cost savings on fuel can be significant.
Sizing Your Wood Stove
As an experienced hearth professional, I can’t stress enough the importance of sizing your wood stove properly. Too small a wood stove and your space is chilly in the dead of winter; too big of wood stove and you’ll have to open the windows to keep from sweating. The wood stove’s physical size is important but should never be determined by the size of the wood you already have cut and ready to use. Understandably, having a wood stove that can burn those 24-inch logs you cut would be nice, but the drawback of having a stove that can’t be understated. The new generation of wood stove will use considerably less fuel and produce much more heat than older wood stoves. British Thermal Unit, or BTU, is the crucial factor in determining the correct wood stove for your situation. Most manufacturers rate their stoves in both BTU and square footage, but be aware that the square footage number is all but useless. The manufacturer can’t know your climate, windows or insulation, which allows them to judge how many square feet a wood stove can heat. This is why you will see a wide swing such as 500 to 2500 square feet on their brochure. Two thousand square feet is a rather large variance. BTU should always be used to determine the proper sizing of a wood stove. A BTU calculator is a very useful tool to determine the correct size for your situation. Log size and burn times are also factors you should consider but only after you have determined the proper BTU.
Class A Solid Fuel Chimney
Whether you are searching for a wood stove insert or a freestanding wood stove, you’ll need to make sure you have a safe chimney in which to vent your wood stove. Always be sure to have your existing chimney swept and inspected before it is put into service, even if you are going to be relining it. Due to the efficiency of modern wood stoves, old masonry fireplaces will require that you line the chimney with the same size pipe as the collar on the wood stove insert. Failure to do this correctly can cause improper drafting, chimney fires and almost certainly a very dissatisfied user. A free standing wood stove will need a chimney to connect to so be aware that you’ll have to purchase and install a properly designed Class A solid fuel chimney system. A NFI Certified professional should be consulted to help you design a chimney system for your home. Dynamite Buys offers this service free-of-charge and we have designed hundreds of systems. Be aware that the cost of pipe can be considerable and will need to be factored into your budget. A new chimney system can easily cost 50 to 100% of the purchase price of the stove.
Locating your Wood Stove
Think of your wood stove as real estate: location, location, location. Locating your wood stove properly can be the difference between a very warm and cozy home and a very dissatisfied consumer. Some houses will limit your choices and force you into finding creative ways of moving heat around your home. If you have the flexibility, try to place your wood stove where it would be centrally located and will allow the heat to move into different areas of the home easily. If not, then develop a strategy to move the heat to different areas of the home such as ceiling fans or turning on the blower of your forced air furnace. If you are installing a new chimney system, keep in mind location so you can minimize chimney offsets and added expense. Also be certain that there is enough room in the space you have chosen to meet the clearance-to-combustibles requirements. Each stove is different in design and requirements and sometimes this can change the placement of the wood stove. A NFI certified professional can help you with this process and be a valuable asset in helping you locate your new wood stove.
Aesthetics
While searching for your wood stove, you don’t forget the aesthetic value of the wood stove you are considering. A wood stove becomes a focal point of a room. Your guests will be drawn to it and even you will find watching the slow dancing flames mesmerizing. So don’t underestimate the importance of how the wood stove looks. This is a purchase you will have for many years and you should find a wood stove that you enjoy looking each and every day.
Other Considerations
A few things to consider before you complete the purchase of your wood stove. Always check with your insurance company and local authorities before planning your installation. Some insurance companies are very averse to insuring wood burning appliances. You may have to go as far as switching insurance companies, so talk with them about your plans. Also, many local governments have strict rules on installation of wood stoves, so always check with them before you finalize your purchase.
Don’t forget that wood stoves burn wood. This may sound obvious but make sure you have a readily available source of fuel. Good dry cord wood is the key to success. In our experience the most common reason customers are dissatisfied with their wood stove is that their wood is too high in moisture causing major losses in efficiency and heat output. Keep in mind that if you don’t have a place to store wood or purchase wood at a reasonable price, then a wood stove may not be for you. Also there is a fair amount of physical effort and time in the use of a wood stove. Don’t undervalue your time and the labor involved.
The last thing to consider is added expenses. Your NFI certified technician can help you identify these expenses during the search process. Things such as hearth pads, wall protection, installation costs and yearly cleaning should factor into your decision.
WoodStovePro.com is not only NFI certified but we are also Master Hearth Certified making us true professionals. We look forward to finding the perfect wood stove for your home.
Recent posts
© 2006-2024 E-Prosites ![]()
![]()
![]()
![]()
![]()